Mastering Homemade Gyros: Pita, Meat & Tzatziki from Scratch
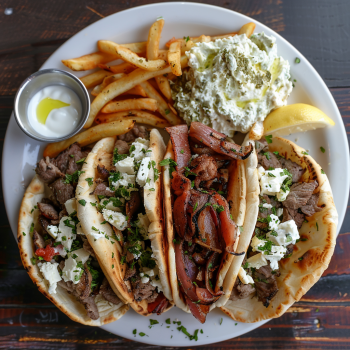
Forget everything you thought you knew about takeout wraps – because today, we’re embarking on a culinary journey to create the real deal: authentic homemade gyros, completely from scratch. Imagine perfectly caramelized, seasoned meat with those irresistible crispy edges, yet incredibly juicy on the inside. Picture the creamy white tzatziki pooling alongside vibrant red tomatoes and bright green cucumbers, all nestled within warm, pillowy pita bread. The aroma of oregano, garlic, and cumin will fill your kitchen, transporting you straight to the bustling streets of Athens. This isn't just a meal; it's an experience, and one that promises to change your perspective on Mediterranean food forever.
The magic of a true gyro lies in its harmonious blend of textures and temperatures – the cool, tangy tzatziki contrasting with the warm, spiced meat, the crispness of fresh vegetables against the soft pita. While the image of a vertical rotisserie might seem daunting for the home cook, rest assured, we've perfected methods that bring that incredible street food flavor and texture right into your kitchen, no specialized equipment required. The joy of making gyros at home means you control every ingredient, every spice level, and every delightful nuance, resulting in a dish that far surpasses any delivery option.
Crafting the Perfect Gyro Meat (No Rotisserie Required!)
The heart of any great gyro is its meat, and achieving that signature texture and robust flavor at home is more accessible than you might think. While traditional Greek gyros often feature layers of seasoned pork or chicken cooked on a vertical spit, we're going to use an ingenious adaptation that yields equally delicious results for the home kitchen. Instead of a rotisserie, we'll form the meat into a dense, compact loaf, roasting it to perfection before crisping it under the broiler – a technique that brilliantly mimics the compressed texture and caramelized edges of spit-roasted meat. For a deep dive into this home-friendly method, check out our guide on
Authentic Homemade Gyros: No Rotisserie Needed.
The secret to our homemade gyro meat lies in the blend of pork shoulder and pork belly. Pork shoulder provides a solid, lean base, while the pork belly introduces a crucial element of fat, ensuring the meat remains incredibly juicy and flavorful during cooking, just as a rotating spit would render fat over time.
Ingredients for Your Gyro Meat:
* 3-4 lbs boneless pork shoulder
* 1.5 lbs skin-off pork belly
* 1 Tbsp smoked paprika
* 1 Tbsp garlic powder
* 1 Tbsp ground cumin
* 1 Tbsp dried oregano
* 1 Tbsp fresh thyme, finely chopped
* 1 Tbsp granulated sugar (helps with caramelization)
* 2 Tbsp kosher salt
* 3 Tbsp white distilled vinegar (tenderizes and adds tang)
**The Process:**
1. **Prep the Meat:** Cut the pork shoulder and pork belly into 1-inch cubes. If you have a meat grinder, this is the time to use it for the best texture. If not, a food processor can work wonders. Pulse the meat in batches until it's finely ground but not pureed. The goal is a dense, cohesive mixture.
2. **Season Generously:** In a large bowl, combine the ground meat with all the spices, sugar, salt, and vinegar. Mix thoroughly with your hands until everything is evenly distributed. Don't be shy; proper seasoning is key to that authentic Greek flavor.
3. **Form the Loaf:** This is a critical step for mimicking rotisserie texture. Tightly pack the seasoned meat mixture into a loaf pan or form it freehand into a log shape on a baking sheet. Press down firmly to remove any air pockets, creating a dense, meatloaf-like consistency. The tighter you pack it, the better the final texture will be.
4. **Roast to Perfection:** Roast the meat loaf in a preheated oven until it's cooked through and starts to develop a beautiful golden-brown crust.
5. **Slice and Crisp:** Once roasted, let the meat rest briefly. Then, slice it thinly, just like you'd see coming off a spit. Arrange these slices on a baking sheet and pop them under the broiler for a few minutes until the edges are wonderfully crispy and caramelized. This final broiling step is what gives your
Greek Street Food at Home: Juicy Gyros, Crispy Edges, & Creamy Tzatziki its undeniable appeal.
The Creamy Counterpart: Authentic Tzatziki Sauce
No gyro is complete without a generous dollop of cool, refreshing tzatziki. This garlicky, cucumber-infused yogurt sauce is the perfect counterpoint to the rich, spiced meat. Making it from scratch ensures unparalleled freshness and flavor.
Key Ingredients for Tzatziki:
* 1 large cucumber (English or regular)
* 2 cups full-fat Greek yogurt (strained for extra thickness)
* 2-3 cloves garlic, minced
* 2 Tbsp fresh dill, finely chopped
* 1 Tbsp extra virgin olive oil
* 1 Tbsp white distilled vinegar or fresh lemon juice
* Salt and black pepper to taste
**Crafting Your Tzatziki:**
1. **Prepare the Cucumber:** Grate the cucumber using the large holes of a box grater. This is crucial: place the grated cucumber in a fine-mesh sieve or a clean kitchen towel and squeeze out as much excess liquid as possible. This prevents your tzatziki from becoming watery.
2. **Combine Ingredients:** In a medium bowl, combine the drained cucumber with the Greek yogurt, minced garlic, fresh dill, olive oil, and vinegar or lemon juice.
3. **Season and Chill:** Stir everything together until well combined. Season generously with salt and pepper. For best results, cover and refrigerate for at least 30 minutes (or even a few hours) to allow the flavors to meld and intensify. The chilling also thickens the sauce further.
Pillowy Perfection: Homemade Pita Bread
While store-bought pita can work in a pinch, making your own pita bread from scratch elevates your homemade gyros to an entirely new level. The warmth, softness, and slight chewiness of fresh pita are simply incomparable. Plus, the satisfaction of watching them puff up like little balloons is truly rewarding!
Ingredients for Pita Bread:
* ¾ cup plus 2 Tbsp (207ml) warm water (around 95°F/35°C)
* 1.5 tsp (6g) active dry yeast
* 1 Tbsp (14g) granulated sugar
* 2 cups (300g) all-purpose flour, plus more for dusting
* 2 tsp (14g) fine sea salt
* 1 Tbsp (13g) extra virgin olive oil
**Baking Your Own Pita:**
1. **Activate the Yeast:** In a small bowl, combine the warm water, yeast, and sugar. Let it sit for 5-10 minutes until foamy, indicating the yeast is active.
2. **Mix the Dough:** In a large bowl, whisk together the flour and salt. Pour in the yeast mixture and olive oil. Mix with a spoon until a shaggy dough forms.
3. **Knead:** Turn the dough out onto a lightly floured surface and knead for 8-10 minutes until it's smooth, elastic, and no longer sticky.
4. **First Rise:** Place the dough in a lightly oiled bowl, turn to coat, cover with plastic wrap, and let it rise in a warm place for 60-90 minutes, or until doubled in size.
5. **Shape the Pitas:** Gently deflate the dough and divide it into 6-8 equal pieces. Roll each piece into a smooth ball. On a lightly floured surface, roll each ball into a flat, round disc about 6-7 inches in diameter and ¼ inch thick.
6. **Cook the Pitas:** Heat a cast-iron skillet or a heavy-bottomed pan over medium-high heat until it's smoking slightly. Cook one pita at a time for 1-2 minutes per side. You'll watch in awe as they puff up beautifully! Flip them once they start to bubble and brown slightly. Stack the cooked pitas and keep them covered with a clean towel to keep them warm and soft.
Assembling Your Masterpiece and Tips for Success
With all your components ready, the best part begins: assembly! Lay out your warm pita, piles of crispy gyro meat, a bowl of luscious tzatziki, and fresh toppings like sliced tomatoes, red onion, and extra cucumber.
**Assembly Tips:**
* **Warm Pita:** Gently warm your pita bread just before serving for the best experience.
* **Layer Generously:** Spread a good amount of tzatziki on the pita, then pile high with the crispy, hot gyro meat.
* **Add Freshness:** Finish with your favorite fresh toppings. Sliced red onion and ripe tomatoes are classic. A sprinkle of fresh parsley or a dash of paprika adds an extra flourish.
* **Don't Overstuff (Too Much):** While tempting, don't overstuff your pita to the point where it can't be folded! A slight overflow is part of the charm.
* **Make Ahead:** Both the gyro meat mixture (before cooking) and the tzatziki can be prepared a day in advance, making this recipe surprisingly convenient for entertaining or weeknight meals.
Creating homemade gyros from scratch is a deeply satisfying culinary adventure. From the aromatic spices of the meat to the cool, fresh tang of the tzatziki and the comforting warmth of homemade pita, every bite is a testament to the joy of cooking. You'll savor the authentic Greek flavors, the delightful contrast of textures, and the immense pride of knowing you created this masterpiece in your own kitchen. Trust us, once you experience the true taste of a homemade gyro, you'll never look back at store-bought versions the same way again. Enjoy your journey to the heart of Mediterranean cuisine!